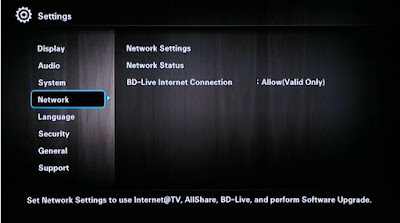
Turn on the Bluray player and select Settings
Select Network
Select the Network Settings
Under Network settings select the Network Type as Wireless
Select Network Settings
Under Network Setting choose select a Wireless Network
Choose a wireless Network from the list
Enter the Wireless security key
Bluray got connected to the network.. Click Ok to Proceed.
It get the ip address and dns address automatically from the wireless router
Test the Network
Finally shows the status.
Sunday, December 26, 2010
Saturday, December 25, 2010
Browse > Home /
Restore point
/ Reverte your computer to a previous restore point - Windows 7
Reverte your computer to a previous restore point - Windows 7
Click Start and Go to Control Panel
Click System and Security
Click System
Click System protection
Click System Resotre
Click Next
Select a Restore point and click Next
Click Finish
Click System and Security
Click System
Click System protection
Click System Resotre
Click Next
Select a Restore point and click Next
Click Finish
Create a Restore Point - Windows 7
Click Start and Go to Control Panel
Click System and Security
Click System
Click System protection
Click Create
Type a name to identify the restore point and click Create
Click System and Security
Click System
Click System protection
Click Create
Type a name to identify the restore point and click Create
Windows 7 - Upgrade Advisor
Download and run the Windows 7 Upgrade Advisor to see if your PC is ready for Windows 7. It scans your hardware, devices, and installed programs for known compatibility issues, gives you guidance on how to resolve potential issues found, and recommends what to do before you upgrade.
Download Now
Download Now
Windows 7 - System Requirement
- 1 gigahertz (GHz) or faster 32-bit (x86) or 64-bit (x64) processor.
- 1 gigabyte (GB) RAM (32-bit) or 2 GB RAM (64-bit).
- 16 GB available hard disk space (32-bit) or 20 GB (64-bit).
- DirectX 9 graphics device with WDDM 1.0 or higher driver.
Browse > Home / / Adjust Monitor Settings
Adjust Monitor Settings
Click the Menu Button on the Front to open the Menu options.
 |
| Menu |
| Icon | Function | Description | |||
|---|---|---|---|---|---|
 | Contrast | Right-Arrow increases the contrast and Left-Arrow decreases the contrast. | |||
 | Brightness | Right-Arrow increases the brightness and Left-Arrow decreases the brightness. | |||
 | Horizontal Position | Right-Arrow moves the image to the right and Left-Arrow moves the image to the left. | |||
 | Horizontal Size | Right-Arrow increases the horizontal size and Left-Arrow decreases the horizontal size. | |||
 | Vertical Position | Right-Arrow moves the image up and Left-Arrow moves the image down. | |||
 | Vertical Size | Right-Arrow increases the vertical size and Left-Arrow decreases the vertical size. | |||
 | Pincushion | Right-Arrow makes the image sides convex and Left-Arrow makes the image concave. | |||
 | Trapezoid | Right-Arrow adjusts the image so the top is larger and Left-Arrow adjusts the image so that the bottom is larger. | |||
 | Pin Balance | Right-Arrow moves the top and bottom of the image to the right and Left-Arrow moves the top and bottom of the image to the left. | |||
 | Parallelogram | This control corrects the tilted vertical edges of the image on both sides of the screen that are in the same direction. | |||
 | Tilt (Rotation) | Right-Arrow tilts the sides of the image to the right and Left-Arrow tilts the sides of the image to the left. | |||
 | Moire | Right-Arrow increases the Moire correction and Left-Arrow decreases the Moire correction. | |||
 | Degauss | This control demagnetizes the screen to reduce color impurities. | |||
 | Color Temp | Right-Arrow selects the color temperature to the right and Left-Arrow selects the color temperature to the left. | |||
 | Reset | This control resets the monitor to factory default values. | |||
 | Exit | This control exits the menu. |
Browse > Home / / picture does not appear
picture does not appear
Monitor is on but picture does not appear
Check to make sure that the cpu is off and also not in standby.
Check to Make sure the VGA cable running from the monitor is screwed in properly in to the back of the CPU.
Check that the Brightness and Contrast Control is at the appropriate position, not at the minimum.
Check to make sure that the cpu is off and also not in standby.
Check to Make sure the VGA cable running from the monitor is screwed in properly in to the back of the CPU.
 |
| Brightness |
 |
| Contrast |
Check that the Brightness and Contrast Control is at the appropriate position, not at the minimum.
Browse > Home / / No Power to the Monitor
No Power to the Monitor
Check the Monitor is turned on.
Check to make sure the power cable is firmly connected to the back of the monitor and in the electrical socket.
Wednesday, December 15, 2010
Connect Kindle to a Wi-Fi network
- Press the Home button, then press the Menu button.
- Navigate to “Settings” by moving the 5-way controller down, then press the 5-way controller to select.
- Select “view” next to “Wi-Fi Settings” to display a list of detected Wi-Fi networks. You may have to wait a moment as your Kindle detects networks in range. Kindle automatically scans for available Wi-Fi networks at periodic intervals. To rescan for available networks at any time, select “rescan.”
- Select “connect” to connect to a network. If you see a lock symbol next to “connect,” the network requires a password to connect.
- If necessary, enter the Wi-Fi network password, and choose “submit.” Press the Symbol key to enter numbers or characters not present on the Kindle keyboard.
Subscribe to:
Posts (Atom)


