Showing posts with label windows 7. Show all posts

Thursday, March 17, 2011

Windows 7 Disk Cleanup

0 comments
  1. Click the Start button and type Cleanup in the search box, then click 'Disk Cleanup' in the search results.
  2. Disk Cleanup will run a quick scan of your hard drive to identify files that can be safely removed.


  1. Tick the box next to the sections you'd like to clear up.
  2. Click 'OK' and follow the on-screen instructions to clean your hard drive.

change your screen resolution

0 comments
  1. Open Screen Resolution by clicking the Start button , clicking Control Panel, and then, under Appearance and Personalization, clicking Adjust screen resolution.


  2. Click the drop-down list next to Resolution, move the slider to the resolution you want, and then click Apply.


  3. Click Keep to use the new resolution, or click Revert to go back to the previous resolution.

Monday, March 7, 2011

Setting Save does not match the Requirement

0 comments
When you Tried Connecting to the wireless network you get a message " The settings save on this computer for the network does not match the requirement of the network".


To Resolve this problem you need to remove the preffered network and then connect to the wireless network.

Click Open network and Sharing center. On the Left side of the screen Click Manage Wireless Network


Right Click the network and click remove network


After removing the network go to connect to a network and try connecting to the wireless network.

Enter Additional Logon Information

0 comments
When you tried connecting to the wireless network it prompts you for additional log on information. You get this message when wep security is enabled on the Wireless Router.


To Resole the problem you need to manually add the wireless network.

Click Start and Select Control Panel


Click on Network and Internet connection


Click Network and sharing center
On the Left side of the screen Click Manage Wireless Network


Click Add


Select Manually Create a Network Profile


Type the Wireless Network Name, password and click Next


Show successfully Added the Network. Click Close.


Windows will take some time to identify the network. Once the network is connected it asks you select the location. If the network is not connected then try restarting the computer.

Compare the Windows 7 Editions

0 comments

Thursday, February 17, 2011

Windows 7 - Home

0 comments
Windows 7 is the latest release of Microsoft Windows, a series of operating systems produced by Microsoft for use on personal computers, including home and business desktops, laptops, netbooks, tablet PCs, and media center PCs. Some of the new features included in Windows 7 are advancements in touch, speech, and handwriting recognition, support for virtual hard disks, support for additional file formats, improved performance on multi-core processors, improved boot performance, and kernel improvements. Some taskbar features, Windows Explorer features, Windows Media Player features, Windows Ultimate Extras, InkBall, Windows Photo Gallery, Windows Movie Maker, Windows Calendar, Windows Mail  are not included with Windows 7.


Windows 7 comes with three Editions Home Premium, Professional, Ultimate. Click Here to compare the three editions.

 Hardware requirement for using windows 7
  • 1 gigahertz (GHz) or faster 32-bit (x86) or 64-bit (x64) processor
  • 1 gigabyte (GB) RAM (32-bit) or 2 GB RAM (64-bit)
  • 16 GB available hard disk space (32-bit) or 20 GB (64-bit)
  • DirectX 9 graphics device with WDDM 1.0 or higher driver 
  • DVD-R/W Drive
  • Internet connection to download updates

If you are ready to upgrade to windows 7 download the Windows 7 Upgrade Advisor to see if your PC is ready for Windows 7. It scans your hardware, devices, and installed programs for known compatibility issues, gives you guidance on how to resolve potential issues found, and recommends what to do before you upgrade.

Monday, February 14, 2011

Windows 7 System Requirement

0 comments
Hardware requirement for using windows 7
  • 1 gigahertz (GHz) or faster 32-bit (x86) or 64-bit (x64) processor
  • 1 gigabyte (GB) RAM (32-bit) or 2 GB RAM (64-bit)
  • 16 GB available hard disk space (32-bit) or 20 GB (64-bit)
  • DirectX 9 graphics device with WDDM 1.0 or higher driver 
  • DVD-R/W Drive
  • Internet connection to download updates

Saturday, December 25, 2010

Create a Restore Point - Windows 7

0 comments
Click Start and Go to Control Panel


Click System and Security


Click System


Click System protection


Click Create


Type a name to identify the restore point and click Create

Windows 7 - Upgrade Advisor

0 comments
Download and run the Windows 7 Upgrade Advisor to see if your PC is ready for Windows 7. It scans your hardware, devices, and installed programs for known compatibility issues, gives you guidance on how to resolve potential issues found, and recommends what to do before you upgrade.

Download Now

Windows 7 - System Requirement

0 comments
  • 1 gigahertz (GHz) or faster 32-bit (x86) or 64-bit (x64) processor.
  • 1 gigabyte (GB) RAM (32-bit) or 2 GB RAM (64-bit).
  • 16 GB available hard disk space (32-bit) or 20 GB (64-bit).
  • DirectX 9 graphics device with WDDM 1.0 or higher driver.

Monday, November 15, 2010

Release static ip in From Local Area Connection

0 comments
Click Start and Go to Control Panel


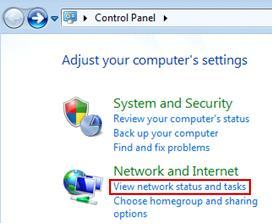
Under Network and Internet Click View Network Status and Tasks


Click Change Adapter settings.


Right Click Local Area Connection and Select Properties


Highlight Internet Protocol version 4 (TCP/IPv4)


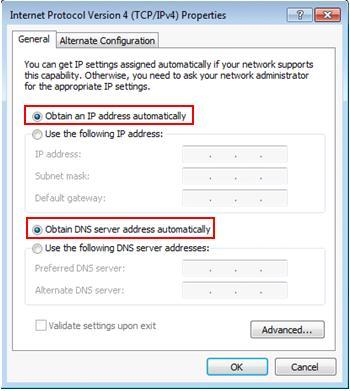
Select Obtain an IP address automatically and Obtain dns address automatically.
Click Ok.

Assign Static in Local Area Connection

0 comments
Click Start and Go to Control Panel


Under Network and Internet Click View Network Status and Tasks


Click Change Adapter settings.


Right Click Local Area Connection and Select Properties


Highlight Internet Protocol version 4 (TCP/IPv4)


Select Use the following IP address to assign static ip address and Dns adderss select use the following dns address.

Assign a Static ip address to the Range of the network. For example if the Gateway address of your network is 192.168.1.1, then assign as 192.168.1.10.  Subnet mask gets filled in automatically. Assign the gateway address. For dns address use static dns address provided by your Service Provider or use any global dns address.

Enter the Correct Values and Click Ok.

Remove Preffered Network on Windows 7

0 comments
Click Start and Select Control Panel


Click on Network and Internet connection


Click Network and sharing center
On the Left side of the screen Click Manage Wireless Network


Right Click the network and click remove network


Release static ip in From Network Connection

0 comments
Click Start and Go to Control Panel


Under Network and Internet Click View Network Status and Tasks


Click Change Adapter settings.


Right Click Wireless Network Connection and Select Properties


Highlight Internet Protocol version 4 (TCP/IPv4)


Select Obtain an IP address automatically and Obtain dns address automatically.
Click Ok.

Assign static ip in Wireless Network Connection

0 comments
Click Start and Go to Control Panel


Under Network and Internet Click View Network Status and Tasks


Click Change Adapter settings.


Right Click Wireless Network Connection and Select Properties


Highlight Internet Protocol version 4 (TCP/IPv4)


Select Use the following IP address to assign static ip address and Dns adderss select use the following dns address.

Assign a Static ip address to the Range of the network. For example if the Gateway address of your network is 192.168.1.1, then assign as 192.168.1.10.  Subnet mask gets filled in automatically. Assign the gateway address. For dns address use static dns address provided by your Service Provider or use any global dns address.

Enter the Correct Values and Click Ok.

Advertisement


Copyright 2008 All Rights Reserved Revolution Two Church theme by Brian Gardner Converted into Blogger Template by Bloganol dot com