Showing posts with label Wireless connection. Show all posts

Monday, November 15, 2010

Remove Preffered Network on Windows 7

0 comments
Click Start and Select Control Panel


Click on Network and Internet connection


Click Network and sharing center
On the Left side of the screen Click Manage Wireless Network


Right Click the network and click remove network


Remove Preffered Network on Windows XP

0 comments
Click Start and Select Control Panel


 Keep the control Panel in classic view and open Network Connection

Right click Wireless Network connection and Select view Available Wireless Networks


Click the Wireless Networks Tab. Highlight the wireless network and click Remove.


Release static ip in From Network Connection

0 comments
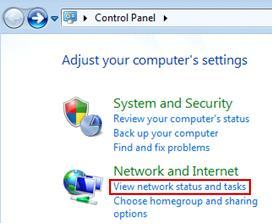
Click Start and Go to Control Panel


Under Network and Internet Click View Network Status and Tasks


Click Change Adapter settings.


Right Click Wireless Network Connection and Select Properties


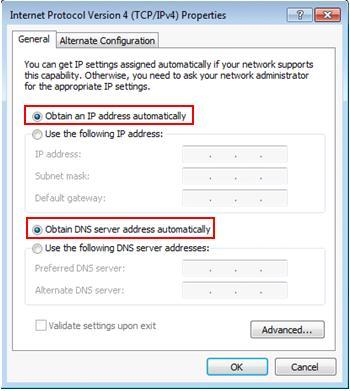
Highlight Internet Protocol version 4 (TCP/IPv4)


Select Obtain an IP address automatically and Obtain dns address automatically.
Click Ok.

Assign static ip in Wireless Network Connection

0 comments
Click Start and Go to Control Panel


Under Network and Internet Click View Network Status and Tasks


Click Change Adapter settings.


Right Click Wireless Network Connection and Select Properties


Highlight Internet Protocol version 4 (TCP/IPv4)


Select Use the following IP address to assign static ip address and Dns adderss select use the following dns address.

Assign a Static ip address to the Range of the network. For example if the Gateway address of your network is 192.168.1.1, then assign as 192.168.1.10.  Subnet mask gets filled in automatically. Assign the gateway address. For dns address use static dns address provided by your Service Provider or use any global dns address.

Enter the Correct Values and Click Ok.

Sunday, November 14, 2010

Connect windows 7 to a wireless Network using wps push button method

0 comments
Click the wireless icon in the system tray.


Select the Network that you want to connect click Connect. If you want to save the settings in the computer then check connect automatically.


Windows detect whether your router support WPS


If the Router supports WPS you will find the option which asks to press the push button.


Gets the Wireless information from the router.


After it gets the information windows automatically connects to the network


Select the Network Location

Connect windows vista to a wireless Network using wps push button method

0 comments
Click Start > Connect To


Select the Wireless Network


When you get this page press the configuration button or wps button on the wireless Router and click Next.


Windows gets the information from the router.


Shows connected successfully to the network. Click Close to finish.

Connect windows vista to a wireless network using WPS Pin method

0 comments
Click Start > Connect To


Select the Network that you want to connect to


Trying to Connect to an Un-configured Network


Type the security pin of the Router and click Next


Configure the wireless settings and click Next.
By default the security type is wpa-personal ( wpa-psk tkip ). Windows will automatically generate a password for you. If you wants to setup you own password, then clear everything from the security key box and type a password of minimum 8 characters.


After completing the setup shows the network name and security key. Click Close to finish.

Connect to a Wireless Network Using WPS pin Method

0 comments
Click the wireless icon in the system tray.


Select the Network that you want to setup.


Tries to Connect to the Network


Click Ok to proceed with the wps setup.
If you doesn't want to configure the network then click connect to the network without setting it up.


Enter the security pin number of the Router and click Next.
you can find the pin number on the Routers Label and also in the Gui of the Router.


Type a Name to your Network and click the drop down menu to change the wireless security information.

By default security type is wpa2-psk aes. If you want you can change it wpa-psk tkip or wep which supports older wireless devices.
Windows will automatically generate a secured password under security key. If you wanted to change the security key then enter a password of minimum of 8 characters under security key.
Click Next to Proceed.


Windows will set up the Router


Apply new settings to the router

After successfully setting up the router the security key will be displayed, which you can print, or copy to a USB memory stick if you’d like to set up additional wireless device to your network.
Click Close to finish the setup.


Select the Network Location and click Close.

Advertisement


Copyright 2008 All Rights Reserved Revolution Two Church theme by Brian Gardner Converted into Blogger Template by Bloganol dot com